Form 1099 MISC
Use the 1099 Report Options screen to print 1099-MISC information regarding the Vendors / Payees and the transactions recorded for them in the software.
Before you begin any of the instructions below, please make sure that you have entered the Tax ID that the IRS has given to your organization. The Tax ID for the Church is entered, from the The Initial Portal of Church Windows, click Administration > Sys Info (System Information). If the Tax ID is missing for a Vendor that needs a 1099 go to Manage Accounts > Accounts +/— > Accounts Payable / Vendors.
To run the report:
- Click Reports/Export in the Button Bar at the top of the screen.
- Click the Tax button and a menu will show the option for 1099 MISC.
- Click the 1099 MISC option.
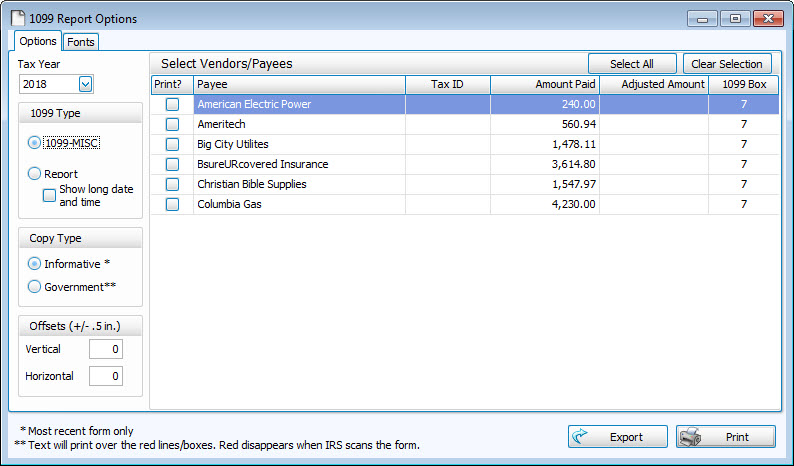
- Click to select the desired Tax Year from the dropdown box.
- Choose the desired 1099 Report Type by clicking the option next to 1099-MISC or Report.
- Choose your desired Copy Type:
- Informative - To use a blank sheet of paper to print the 1099 data, along with the structure of the tax form.
- Government - To print only the data onto a the preprinted Form 1099 MISC acceptable by the IRS.
Note:
If you chose Report for your 1099 Report Type, you will not be required to choose a Copy Type.
- Place a
 checkmark in the Print box to Select Vendor / Payees in the list, or click the button to Select All or Clear Selection.
 - Type the Adjusted Amount for any applicable vendor / payee in the list.
- If the 1099 Box differs from the one displayed on the screen, click the box and choose a different one from the dropdown list that appears.
- If you find that you must adjust the Vertical or Horizontal positioning of the tax form data, you can place a number between -0.5 and 0.5 in any of the Offsets boxes on the Options tab.
- The default positioning for each (vertical or horizontal) is 0.
- Placing a negative number moves the printable tax data that many inches towards the left (Horizontal) or below (Vertical) its default positioning.
- Placing a positive number moves the printable tax data that many inches towards the right (Horizontal) or above (Vertical) its default positioning.
- If you wish to change the font style of the text on the form, click the Body Text button located on the Fonts tab tab.
- Make your selections and click OK.
- A sample of the changes you made will show next to the Body Text button.
- If you wish to change the font style back to its original state, click the Reset to Default button.
- Once you have made all of your selections, click Print to view a Print Preview and then proceed in sending the file to your printer. You can also Export most reports and/or Send via Email as a file to be used outside of Church Windows.